Adding a Plugin to DevScribe
Have a plugin you’ve built and want to try it out in DevScribe? You can add it directly from your local machine using the Plugin Manager.
Once your plugin is ready to share with others, you can also add it to the DevScribe Plugin Store so that users can find and download it from DevScribe.
This page covers both workflows.
Add a Plugin Locally
Local plugins are useful when you’re developing or testing a plugin. You can add the plugin directory directly to DevScribe without publishing it to the Plugin Store.
1. Open the Installed Plugins section
In DevScribe:
- Click Plugins in the right-side toolbar.
- Select Installed in the Plugin Manager.
- Click Add plugin locally.
If you haven’t added any plugins yet, you’ll see Add your first plugin locally instead.
2. Select your plugin directory
Select the directory containing your plugin.
DevScribe will load the plugin from that directory and add it to your Installed plugins.
Your plugin directory should contain a manifest.json file at its root. This file tells DevScribe how to identify and load the plugin.
For example:
{
  "id": "my-plugin",
  "name": "My Plugin",
  "version": "1.0.0",
  "description": "A short description of my plugin.",
  "fileType": "custom-tool",
  "route": "/my-plugin",
  "entry": "index.html"
}
The manifest requires the following fields:
| Field | Description |
|---|---|
id | Unique identifier for the plugin |
name | Name of the plugin |
version | Plugin version |
description | Short description of the plugin |
fileType | File type associated with the plugin |
route | Route used by the plugin |
entry | Entry point used to load the plugin |
Where are local plugins stored?
DevScribe stores local plugins in:
~/.devscribe/plugins/You don’t normally need to manage this directory yourself. The Add plugin locally option handles adding the plugin to DevScribe.
Test Your Plugin
Once your plugin has been added locally, you can use it inside DevScribe and check that everything works as expected.
This is especially useful during development:
You can keep the plugin local for as long as you need while developing it.
Share a Plugin Through the Plugin Store
If you’ve built a plugin that you’d like other DevScribe users to access, you can add it to the DevScribe Plugin Store.
The store is maintained through the following GitHub repository:
DevScribe Plugin Store repository
The repository contains the information DevScribe uses to display plugins in the Plugin Store.
A plugin entry includes information such as:
{
  "id": "bigquery",
  "name": "BigQuery",
  "version": "1.0.0",
  "description": "Google BigQuery client for running queries, browsing datasets and tables, and viewing results.",
  "categories": [
    "database",
    "development",
    "tools"
  ],
  "tags": [
    "database",
    "sql",
    "bigquery"
  ],
  "downloadUrl": "https://github.com/example/plugin/releases/download/v1.0.0/plugin-1.0.0.zip",
  "releasedAt": "2026-08-24T15:36:49Z",
  "author": "Developer Name"
}
The store information is used to build the plugin card shown to users. This includes the plugin’s name, version, description, categories, tags, author, and download information.
Local or Plugin Store?
Not sure which option you need? The difference is simple:
| Add locally | Plugin Store | |
|---|---|---|
| Use it for | Development and testing | Sharing a plugin with other users |
| Added through | Plugins → Installed → Add plugin locally | DevScribe Plugin Store repository |
| Who can access it? | Your local DevScribe installation | DevScribe users through the Plugin Store |
A good workflow is to develop and test your plugin locally first. Once you’re happy with it, you can make it available through the Plugin Store.
What’s Next?
If you haven’t built your plugin yet, start with Building a DevScribe Plugin to learn how to create the plugin and connect it to DevScribe.
For the complete plugin API and development specifications, see AI Context to build Plugins.
Adding a Plugin to DevScribe
Have a plugin you’ve built and want to try it out in DevScribe? You can add it directly from your local machine using the Plugin Manager.
Once your plugin is ready to share with others, you can also add it to the DevScribe Plugin Store so that users can find and download it from DevScribe.
This page covers both workflows.
Add a Plugin Locally
Local plugins are useful when you’re developing or testing a plugin. You can add the plugin directory directly to DevScribe without publishing it to the Plugin Store.
1. Open the Installed Plugins section
In DevScribe:
- Click Plugins in the right-side toolbar.
- Select Installed in the Plugin Manager.
- Click Add plugin locally.
If you haven’t added any plugins yet, you’ll see Add your first plugin locally instead.
2. Select your plugin directory
Select the directory containing your plugin.
DevScribe will load the plugin from that directory and add it to your Installed plugins.
Your plugin directory should contain a manifest.json file at its root. This file tells DevScribe how to identify and load the plugin.
For example:
{
  "id": "my-plugin",
  "name": "My Plugin",
  "version": "1.0.0",
  "description": "A short description of my plugin.",
  "fileType": "custom-tool",
  "route": "/my-plugin",
  "entry": "index.html"
}
The manifest requires the following fields:
| Field | Description |
|---|---|
id | Unique identifier for the plugin |
name | Name of the plugin |
version | Plugin version |
description | Short description of the plugin |
fileType | File type associated with the plugin |
route | Route used by the plugin |
entry | Entry point used to load the plugin |
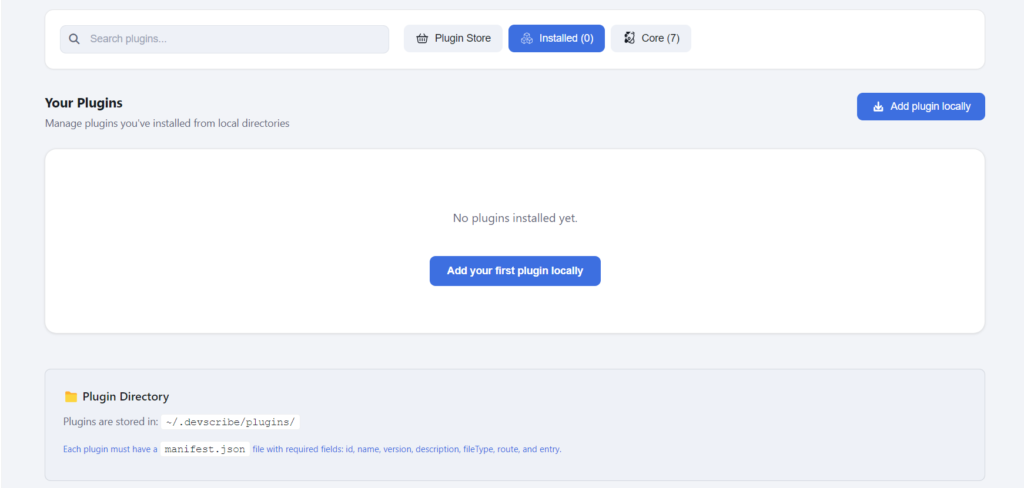
Still bewildered? Here’s a walk through on how to install a plugin locally:
Where are local plugins stored?
DevScribe stores local plugins in:
~/.devscribe/plugins/You don’t normally need to manage this directory yourself. The Add plugin locally option handles adding the plugin to DevScribe.
Test Your Plugin
Once your plugin has been added locally, you can use it inside DevScribe and check that everything works as expected.
This is especially useful during development.
You can keep the plugin local for as long as you need while developing it.
Share a Plugin Through the Plugin Store
If you’ve built a plugin that you’d like other DevScribe users to access, you can add it to the DevScribe Plugin Store.
The store is maintained through the following GitHub repository:
DevScribe Plugin Store repository
The repository contains the information DevScribe uses to display plugins in the Plugin Store.
A plugin entry includes information such as:
{
  "id": "bigquery",
  "name": "BigQuery",
  "version": "1.0.0",
  "description": "Google BigQuery client for running queries, browsing datasets and tables, and viewing results.",
  "categories": [
    "database",
    "development",
    "tools"
  ],
  "tags": [
    "database",
    "sql",
    "bigquery"
  ],
  "downloadUrl": "https://github.com/example/plugin/releases/download/v1.0.0/plugin-1.0.0.zip",
  "releasedAt": "2026-08-24T15:36:49Z",
  "author": "Developer Name"
}
The store information is used to build the plugin card shown to users. This includes the plugin’s name, version, description, categories, tags, author, and download information.
Local or Plugin Store?
Not sure which option you need? The difference is simple:
| Add locally | Plugin Store | |
|---|---|---|
| Use it for | Development and testing | Sharing a plugin with other users |
| Added through | Add plugin locally under Installed plugins option | DevScribe Plugin Store repository |
| Who can access it? | Your local DevScribe installation | DevScribe users through the Plugin Store |
A good workflow is to develop and test your plugin locally first. Once you’re happy with it, you can make it available through the Plugin Store.
What’s Next?
If you haven’t built your plugin yet, start with Building a DevScribe Plugin to learn how to create the plugin and connect it to DevScribe.
For the complete plugin API and development specifications, see AI Context to build Plugins.
